MakeCode Microbit 遊戲設計:「接雞蛋」(Microbit Game: Egg Catching)

若您覺得文章寫得不錯,請點選文章上的廣告,來支持小編,謝謝。

If you like this post, please click the ads on the blog or buy me a coffee. Thank you very much.


小編曾做過 Scratch 遊戲:接雞蛋,而且最近剛好看到Youtube 上的影片:Micro:bit 創意遊戲:「接水果。於是來教大家自己用Microbit來做一個玩玩吧。The blog post: Scratch 遊戲:接雞蛋 created a egg-catching game. And there is a video on youtube: Micro:bit 創意遊戲:「接水果. So, this post will create a Microbit game: Egg Catching.

首先來分析影片中遊戲的功能有哪些:
Game design:
  1. 角色「player」(就是玩家你囉),位在最下方的紅點。Player will be at (x, y) = (2, 4) when the game is started.
  2. 角色「egg」(從天而降的雞蛋),位於上方不停落下的紅點。Egg will be at (x, y) = (pick random 0 to 4, 0) when the game is started.
  3. A按鈕將「player」角色往左移動一格。When the A button is pressed, player moves to the left.
  4. B按鈕將「player」角色往右移動一格。When the B button is pressed, player moves to the right.
  5. 「player」角色接到「egg」角色時,會有動畫與音效,並得一分。When the player catches the egg, score 1 and perform some animation and play a melody.
  6. 雞蛋落到地面三次時,遊戲結束,並顯示Game Over,以及總得分。When the egg fall to the ground three times, the game is over. Show "Game Over" and total score on the screen.

製作步驟 Steps
步驟零:開啟 Makecode Microbit Editor (Step 0: open Makecode Microbit Editor

步驟一:建立新專案 (Step 1: Create New Project)
點選有  + 號的 New Project
Click the + symbol to create a New Project


專案名稱可用 CatchMe,按下 Create 按鈕
Give your project a name: CatchMe, click Create button.


步驟二:建立變數(Step 2: Make variables)
使用 Make a Variable 來建立兩個變數:egg 與 player 。
Click Make a Variable  to make two variables: egg and player .


步驟三:當Microbit啟動時(Step 3: When Microbit is on start)
這兒有三件事要做,如下說明:
Three things to be done here, as the following descriptions:
  1. 角色「player」(就是玩家你囉),位在最下方的紅點。Player will be at (x, y) = (2, 4) when the game is started.
  2. 角色「egg」(從天而降的雞蛋),位於上方不停落下的紅點。Egg will be at (x, y) = (pick random 0 to 4, 0) when the game is started.
  3. 設定生命數為3。 Set 3 lives to the game.

步驟四:當按鈕按下時(Step 4: When a button is pressed)
這兒有兩件事要做,如下說明:
Two things to be done here, as the following descriptions:
  1. A按鈕將「player」角色往左移動一格。When the A button is pressed, player moves to the left.
  2. B按鈕將「player」角色往右移動一格。When the B button is pressed, player moves to the right.

步驟五:不停重複(Step 5: forever)
這兒有三件事要做,如下說明:
Three things to be done here, as the following descriptions:
  1. 雞蛋一秒下降一格。The egg moves down every second.

  2. 「player」角色接到「egg」角色時,會有動畫與音效,並得一分。When the player catches the egg, score 1 and perform some animation and play a melody.

  3. 雞蛋落到地面三次時,遊戲結束,並顯示Game Over,以及總得分。When the egg fall to the ground three times, the game is over. Show "Game Over" and total score on the screen.


Demo Video:


程式範例網址(Blocks Code Example):https://makecode.microbit.org/_PVdiyw6TbfdW

雲造研習紀錄:USB手搖充電式手電筒

2020/09/19 小編參加雲造所舉辦的研習【USB手搖充電式手電筒】,此文為小編的筆記與心得記錄。

【USB手搖充電式手電筒】介紹影片:


材料與電路圖:


單獨檢測個別電子材料,這很重要,因為等焊接好後,再來檢測有沒有問題時,就已經太遲了。

小編的成品


心得:小編的焊接技巧尚需加強。此課程適合給已經懂點電路的學生喔!

Microbit 遊戲設計:誰是快手高手(Microbit Game Design: Who's The Fastest Clicker)

若您覺得文章寫得不錯,請點選文章上的廣告,來支持小編,謝謝。

If you like this post, please click the ads on the blog or buy me a coffee. Thank you very much.

本篇文章將講解如何製作一個簡易的兩人按鈕競賽遊戲:誰是快手高手。
This article will create a simple two players microbit game: Who's the fastest clicker. 

一、遊戲功能如下(Game Design):
  • 遊戲開始時將球放在LED矩陣正中央的x,y座標(2, 2)上。Light up the LED at (2,2) when the game started.
  • 按下A按鈕時,球往左移動。The ball moves to the left when the button A is pressed.
  • 按下B按鈕時,球往右移動。The ball moves to the right when the button B is pressed.
  • 碰到牆壁時,有兩種情況:There are two conditions when the ball hits the edge:
    • 1. 左邊牆壁,球的x座標等於0時,球的y座標減 1 ,球的x座標設為4。Left edge: when the ball's x equals to 0, ball's y minus 1 and assign ball's x to 4.
    • 2. 右邊牆壁,球的x座標等於4時,球的y座標加 1 ,球的x座標設為0。Right edge: when the ball's x equals to 4, ball's y plus 1 and assign ball's x to 0.
  • 當球的座標為(0,0)或(4,4)時,遊戲結束。When the ball is in (0,0) or (4,4), the game is over.

二、積木程式(Blocks Code)
遊戲開始時將球放在LED矩陣正中央的x,y座標(2, 2)上。Light up the LED at (2,2) when the game started.


按下A按鈕時,球往左移動。The ball moves to the left when the button A is pressed.
碰到左邊牆壁,球的x座標等於0時,球的y座標減 1 ,球的x座標設為4。Left edge: when the ball's x equals to 0, ball's y minus 1 and assign ball's x to 4.


按下B按鈕時,球往右移動。The ball moves to the right when the button B is pressed.
碰到右邊牆壁,球的x座標等於4時,球的y座標加 1 ,球的x座標設為0。Right edge: when the ball's x equals to 4, ball's y plus 1 and assign ball's x to 0.


當球的座標為(0,0)或(4,4)時,遊戲結束。When the ball is in (0,0) or (4,4), the game is over.


三、結果(The Results)
影片(Demo Video):


請自由發揮額外功能,例如計分與計時等。
More Ideas examples: Scoring and game timing...etc. 

範例網址(Example Code):https://makecode.microbit.org/_ioggvUW2jCwL


Microbit 遊戲設計:猜數字遊戲(Microbit: Number Guessing Game)

若您覺得文章寫得不錯,請點選文章上的廣告,來支持小編,謝謝。

If you like this post, please click the ads on the blog or buy me a coffee. Thank you very much.

本篇文章將講解如何製作一個簡易的猜數字遊戲。
This post introduces how to create a simple number-guessing game with Microbit.

一、遊戲功能如下:The game functions:
  • 遊戲一開始自動產生一個 0 - 9 的數字讓使用者猜猜看。Pick a random from 0 to 9 when the game starts. 
  • A 按鈕使用者猜數字,每按一次則加 1。Plus one to user's guess when button A is pressed.
  • B 按鈕使用者猜數字,每按一次則減 1。Minus one to user's guess when button B is pressed.
  • A + B 按鈕比較結果,使用者猜對時,遊戲重頭開始。When button A and button B are pressed, check the result. If the user's guess is correct, the game restarts.
二、積木程式 The Blocks
先使用 Make a Variable 來建立兩個變數:answerguess
Click Make a Variable to create two variables:answer and guess.

遊戲一開始自動產生一個 0 - 9 的數字讓使用者猜猜看。 
Pick a random from 0 to 9 when the game starts. 


A 按鈕使用者猜數字,每按一次則加 1。
Plus one to user's guess when button A is pressed.


B 按鈕使用者猜數字,每按一次則減 1。
Minus one to user's guess when button B is pressed.

A + B 按鈕比較結果,使用者猜對時,遊戲重頭開始。
When button A and button B are pressed, check the result. If the user's guess is correct, the game restarts.


三、結果 The results
影片 Video:

請自由發揮額外功能,例如計分與計時等。
Please adding extra functions. For example, timing or scoring.

範例網址Project sample :https://makecode.microbit.org/_0AuayChcLDdW

EV3 認識方向符號小遊戲(EV3 Direction Game)

若您覺得文章寫得不錯,請點選文章上的廣告,來支持小編,謝謝。

If you like this post, please click the ads on the blog or buy me a coffee. Thank you very much.

一、遊戲設計規劃(Game Design)
EV3 主機上有六顆按鈕(圖片來源:https://www.ev3dev.org/docs/tutorials/using-ev3-buttons/)
There are six buttons on EV3 brick

1:BACKSPACE 後退
2:UP 向上
3:LEFT 向左
4:ENTER 確認(進入)
5:RIGHT 向右
6:DOWN 向下

我們可以設計一個會顯示上、下、左、右的四個箭頭來玩遊戲認識箭頭方向的小程式。程式流程如下:
1. 程式開始時,播放歡迎音效。
2. 每一秒取 0 到 3 的亂數,分別用來顯示上、下、左、右的四個箭頭,數字代表箭頭符號如下表示:
  • 數字 0 為 向上箭頭
  • 數字 1 為 向左箭頭
  • 數字 2 為 向右箭頭
  • 數字 3 為 向下箭頭
3. 按下對應的箭頭按鈕時,清除畫面並播放音效。

We could design a simple game to understand the direction symbols. The program flow is:
1. Play a welcome sound when the game is started.
2. Pick up a [0-3] random that indicates each direction symbol every second. Number has its' meaning as the following:
  • Number 0 is up arrow.
  • Number 1 is left arrow.
  • Number 2 is right arrow.
  • Number 3 is down arrow.
3. When a button is pressed, clear the screen and play a sound.

二、遊戲程式積木(The Game Blocks)
程式開始時,播放歡迎音效。Play a welcome sound when the game is started.


每一秒取 0 到 3 的亂數,分別用來顯示上、下、左、右的四個箭頭。Pick up a [0-3] random that indicates each direction symbol every second.


按下對應的箭頭按鈕時,清除畫面並播放音效。When a button is pressed, clear the screen and play a sound.


三、結果(The Result)
影片(Video):


MakeCode Mindstorm Project 專案範例網址:https://makecode.com/_hiDJUH6oiMPU

樹莓派官方燒錄程式介紹(Introduction to Raspberry Pi Imager )

若您覺得文章寫得不錯,請點選網誌上的廣告,來支持小編,謝謝。

樹莓派官網在最近出了一款軟體叫做 Raspberry Pi Imager


有三種平台的版本:Windows、macOS、Ubuntu,此篇文章是以 Windows 版本做說明。
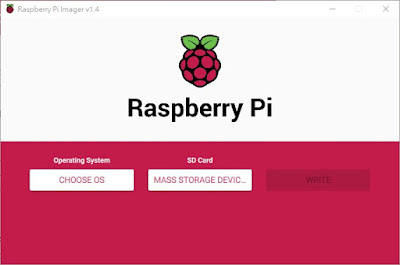
安裝好 Raspberry Pi Imager 後,此軟體的畫面如下,筆者點選左邊的 CHOOSE OS 按鈕


選擇 Raspberry Pi OS (32bit) 下圖中的第一個選項:

接著選擇 SD 卡,筆者只接一張到電腦上:

詢問要不要刪除 SD 卡上的所有資料,筆者選擇 YES


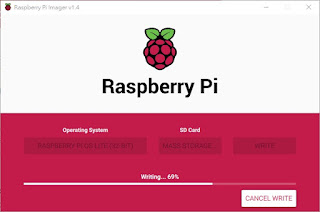
寫入資料中:


驗證資料中:

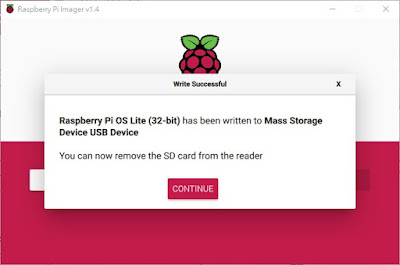
完成,請移除 SD 卡後,按下CONTINUE


開機畫面:


Raspberry Pi Imager 這套軟體比以往的軟體還方便好用多了,省去很多煩人的步驟,真是好事一件!

Tinkercad Circuits:不用Arduino來控制三色LED燈(RGB LED without Arduino)

若您覺得文章寫得不錯,請點選網誌上的廣告,來支持小編,謝謝。

本文要在不使用 Arduino 下,來控制 RGB LED 燈的顏色。TinkerCAD Circuit 範例網址:https://www.tinkercad.com/things/8PDEwFnhgLM

材料:
  1. RGB LED 一顆
  2. Power Supply 三台
  3. 1K Resistor 三條


電路接線:


Demo 影片:


樂高 NXT 感測器鼓 ( Lego NXT Sensor Drum )

若您覺得文章寫得不錯,請點選網誌上的廣告,來支持小編,謝謝。

小編看到底下影片後,就想自己動手做一個類似的程式


於是小編使用 NXT 主機與兩個感測器:聲音感測器( Sound Sensor ) 與距離感測器 ( Ultrasonic Sensor ) 各做一個程式。

聲音感測器影片:


距離感測器影片:


Python for VEX IQ:馬達控制 (Python for VEX IQ: Motor Controlling )

若您覺得文章寫得不錯,請點選網誌上的廣告,來支持小編,謝謝。

本文要使用由 Robot Mesh 公司所開發的 Robot Mesh Studio ( https://www.robotmesh.com/studio )整合環境,並用Python來控制模擬器上機器人的動作。

首先要先組裝積木,筆者參考此影片來組裝


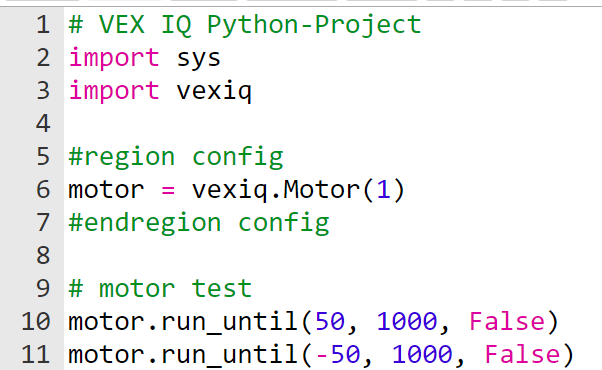
筆者所使用的程式碼如下,此程式碼控制馬達正轉與反轉:

Python for VEX IQ (Python for VEX IQ 入門)

若您覺得文章寫得不錯,請點選網誌上的廣告,來支持小編,謝謝。

本文要介紹由 Robot Mesh 公司所開發的 Robot Mesh Studio ( https://www.robotmesh.com/studio ),這是一款雲端積木程式整合環境,並可用模擬器來模擬VEX IQ、VEX EDR、VEX V5等設備實體機器人的動作。(註:VEX V5 是 VEX EDR的新名稱,感謝喬智創意 粘振國教練提供的資訊。)

可以選擇的程式語言有 Blockly、Python、C++等
可以從網頁左上方的 Quick Start 來體驗一下模擬器,此處筆者選擇 IQ Quickstart Mimic Project  

開啟後就可以看到如下畫面了,最左邊是積木程式與程式區,中間可以看到 VEX IQ 的模擬器,最右邊是感測器的設定。


按下 Run 的按鈕,就可以看到車子如何動了。看下 Generated Code ,是用 Python 語言喔


下回將揭曉要怎麼建立一個用 Python 寫 VEX IQ 程式的專案!


參考資料: