
First NDS Programming Project: hello nds
div>此篇文章介紹如何在 Windows 系統上建立 Nintendo DS 的遊戲程式開發環境。
This post introduces "how to setup Nintendo DS game programming development environment on Windows".
步驟一:安裝 devkitPro
Step 1: Install devkitPro
Go to https://github.com/devkitPro/installer/releases/tag/v3.0.3 to download.
安裝方式可參考此影片
Watch this video to install devkitPro
在選擇 Choose Components 時,請將 NDS Development 勾選。
Check the NDS Development in "Choose Components" window.

步驟二:下載模擬器與韌體
Step 2: Down DS emulator and firmware
DS的模擬器有好幾款,而筆者選用 melonDS ,下載解壓縮即可。
There are serveral emulator for NDS. We could choose melonDS. Just download it and extract it.
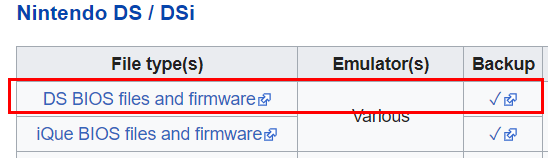
至 https://emulation.gametechwiki.com/index.php/Emulator_Files#Nintendo_DS_.2F_DSi 下載 DS BIOS 與 firmware 檔案。
Go to https://emulation.gametechwiki.com/index.php/Emulator_Files#Nintendo_DS_.2F_DSi to download BIOS and firmware binary files.
步驟三:設定 melon DS
Step 3: Setting melon DS
開啟 melon DS,選擇 Config --> Emu settings
Run melon DS and open Emu settings (Config --> Emu settings)

在 DS-mode 分頁選擇 DS ARM9 BIOS、DS ARM7 BIOS、DS firmware檔案路徑。
Choose DS ARM9 BIOS, DS ARM7 BIOS, DS firmware binary files in DS-mode tab.

步驟四:編譯 hello world 範例
Step 4: Building hello world example
開啟 MSys2 (以Windows 10 為例,在開始 --> devkitPro --> MSys2)。
Open MSys2(Start --> devkitPro --> MSys2 on Windows 10)
切換至範例所在資料夾的指令:
Change folder to "hello_world" example command:
cd /c/devkitPro/examples/nds/hello_world
編譯並產生執行檔的指令:
Building it command:
make
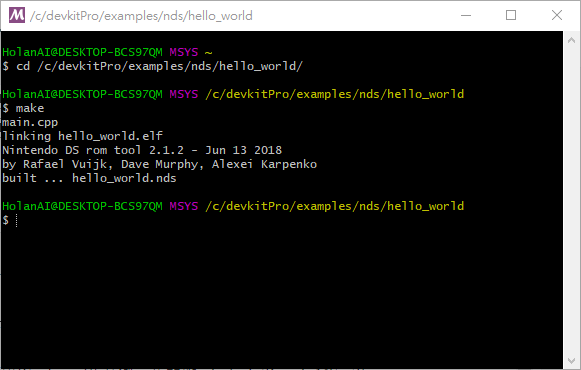
The binary file is ready when we see "built ... hello_world.nds".
步驟五:模擬器測試
Step 5: Testing on Emulator
開啟 melon DS,選擇 File --> Open Roms
Run melon DS. Click File --> Open Roms

Emulator Demo Video:
步驟六:實機測試
Step 6: Run it on NDS device
See https://dsi.cfw.guide/sd-card-setup.html to set up a SD card.
Then copy "hello_world.nds" to SD card.
On DS device Video:
References:
若您覺得文章寫得不錯,請點選文章上的廣告,來支持小編,謝謝。
If you like this post, please click the ads on the blog or buy me a coffee. Thank you very much.
留言