If you like this post, please click the ads on the blog. Thank you very much.
某位同事問我:「你有用Arduino Uno當 ISP 燒錄器來燒錄bootloader嗎?」
「沒實際用過,但看過教學文章。」底下就是我參考的文章:
將Arduino Uno當做一台ISP線上燒錄器,燒錄bootloader或sketch到麵包板上的ATmega328P-PU晶片
「沒實際用過,但看過教學文章。」底下就是我參考的文章:
將Arduino Uno當做一台ISP線上燒錄器,燒錄bootloader或sketch到麵包板上的ATmega328P-PU晶片
簡單整理一下軟體燒錄的流程:
To sum up the bootloader uploading steps:
To sum up the bootloader uploading steps:
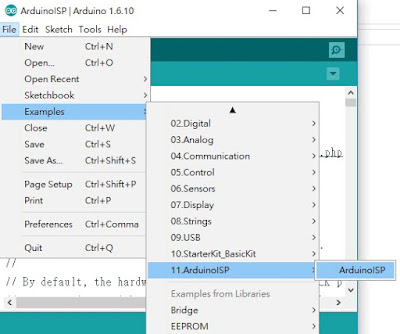
1. 燒錄ArduinoISP範例在一塊Uno板子上,讓它當成ISP燒錄器(底下稱為Uno ISP板)。
1. Upload ArduinoISP example code in a Arduino UNO for being an AVR ISP.
2. 將線路接好,Uno ISP板連接主機電腦後,開啟Arduino IDE 軟體。
2. After connecting the circuit, the AVR ISP is ready. Then, open Arduino IDE.
3. 設定 Tools ==> Board 選為 Uno。
3. Configure the board as "Arduino/Genuino Uno"
4. 設定 Tools ==> Serial Port。
4. Select your AVR ISP serial port number.
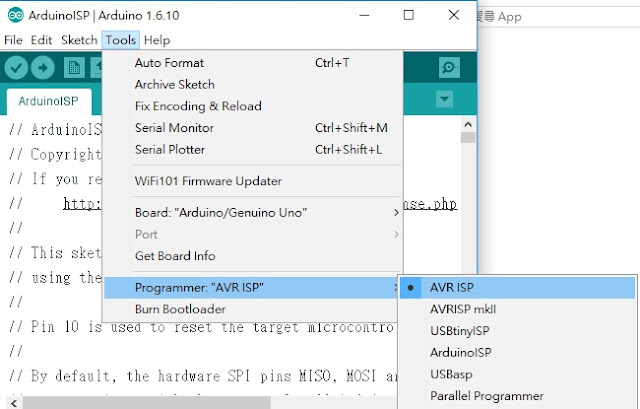
5. 設定 Tools ==> Programmer為Arduino as ISP。
5. Configure programmer as "AVR ISP"
6.執行 Tools ==> Burn Bootloader。
6. Execute "Burn Bootloader"
6. Execute "Burn Bootloader"
便可將 bootloader 燒錄到 ATmega328P-PU晶片,此外若沒燒錄 bootloader 的話,將無法用Uno板去燒錄韌體到ATmega328P-PU晶片裡。
Right now, we have burnt bootloader into ATmega328P-PU. The Arduino IDE can't upload any code to UNO without the bootloader.
Right now, we have burnt bootloader into ATmega328P-PU. The Arduino IDE can't upload any code to UNO without the bootloader.


沒有留言:
張貼留言