發表文章

目前顯示的是有「Linux」標籤的文章

掌握樹莓派的瑞士刀:Raspbian / Debian Linux 常用指令(Commonly Used Raspberry Pi Commands)

對於剛接觸樹莓派(Raspberry Pi)的玩家來說,從圖形介面走向「終端機(Terminal)」是核心的必經之路。Raspbian 作業系統基於 Debian Linux,因此這裡整理的指令,不僅在樹莓派上暢行無無阻,在多數的 Linux 環境中也完全通用。 本文根據筆者多年的實戰經驗,將常用的指令分為 檔案系統 、 搜尋 、 網路 以及 系統進階 四大類,方便大家隨時查閱。 一、 檔案系統與路徑管理 這是最頻繁使用的基本動作,用來在樹莓派的資料夾世界中穿梭與操控檔案。 1. 瀏覽與路徑切換 ls (List files) :列出目前路徑下的檔案與資料夾。 常用變化 : ls -al 可以連同隱藏檔、權限、檔案大小一起詳細列出。 cd (Change Directory) :切換資料夾。 常用變化 : cd .. 回到上一層; cd ~ 回到使用者的家目錄。 pwd (Print Working Directory) :顯示目前所在的工作資料夾完整路徑。 2. 資料夾與檔案操作 mkdir (Make Directory) :建立新資料夾。 範例 : mkdir project rmdir (Remove Directory) :刪除「空」的資料夾。 rm (Remove) :刪除檔案。 常用變化 : rm -rf folder_name 強制刪除整個資料夾及其所有內容(使用時請務必小心)。 cp (Copy) :複製檔案或資料夾。 範例 : cp file1.txt file2.txt (複製資料夾需加 -r )。 mv (Move) :移動檔案或資料夾,同時也常用來做「重新命名」。 範例 : mv old.txt new.txt (重新命名)。 touch :若檔案不存在則建立一個新的空檔案;若檔案已存在則更新其最後修改時間。 範例 : touch script.py 3. 讀取檔案內容 cat (Concatenate) :在終端機直接印出檔案的完整內容。 head :只顯示檔案的前幾行(預設為前 10 行)。 tail :只顯示檔案的最後幾行。 常用變化 : tail -f log.txt 可以即時監控檔案的更新,適合看 log。 4. 權限與擁有者管理 chmod (Change Mode) :修改檔案或資料夾的權限。 範...

在 Ubuntu 上架設郵件伺服器

圖片
在架設郵件伺服器之前,需要有個網域名稱。讀者可至  https://codotvu.co/  申請免費網域名稱。本文使用 Ubuntu 20.04 做為架設的系統。 安裝與設定 postfix  安裝指令為 sudo apt install postfix 選擇 Internet Site 填入網域名稱,筆者填入自己在  https://codotvu.co/  的網域名稱 yunlinsong.co.vu 設定接收管理者收到Mail的Linux帳號名稱 設定伺服器接收哪些網域的Mail,並轉寄給User 這邊選擇 No Reply mail IP 設定,使用預設值即可 信箱大小,用 0 表示無上限 使用預設的 + 選擇 all,這樣 ipv4 與 ipv6 皆可使用   測試郵寄發送 使用 telnet 與 mail server 建立連線 telnet localhost 25 輸入底下指令設定寄件者與收件者: mail from: 寄件者信箱 rcpt to: 收件者信箱 輸入 data 指令,編輯信件內容。使用 獨立一行 的 . 符號 表示來結束內容編輯。輸入 quit 指令結束 telnet。 範例: 此時,就可以去收件人信箱看看有沒有收到郵件了。 若您覺得文章寫得不錯,請點選文章上的廣告,來支持小編,謝謝。 If you like this post, please click the ads on the blog or  buy me a coffee . Thank you very much.

樹莓派官方燒錄程式介紹(Introduction to Raspberry Pi Imager )

圖片
樹莓派官網 在最近出了一款軟體叫做 Raspberry Pi Imager : 有三種平台的版本:Windows、macOS、Ubuntu,此篇文章是以 Windows 版本做說明。 安裝好  Raspberry Pi Imager  後,此軟體的畫面如下,筆者點選左邊的  CHOOSE OS 按鈕 後 選擇 Raspberry Pi OS (32bit)  下圖中的第一個選項: 接著選擇 SD 卡,筆者只接一張到電腦上: 詢問要不要刪除 SD 卡上的所有資料,筆者選擇 YES 寫入資料中: 驗證資料中: 完成,請移除 SD 卡後,按下 CONTINUE : 開機畫面: Raspberry Pi Imager  這套軟體比以往的軟體還方便好用多了,省去很多煩人的步驟,真是好事一件! 若您覺得文章寫得不錯,請點選文章上的廣告,來支持小編,謝謝。 If you like this post, please click the ads on the blog or  buy me a coffee . Thank you very much.

RetroArch 遊戲機模擬器試玩

圖片
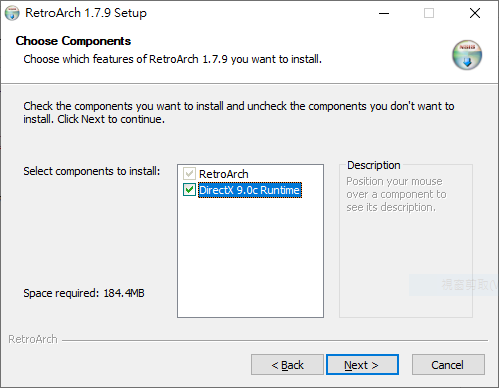
本站的文章: 樹莓派之遊戲機製作 、 樹莓派 Retropie 遊戲金手指 介紹了如何使用樹莓派製作一個遊戲機以及遊戲機的金手指功能。Retropie系統是以RetroArch為基礎的,而RetroArch是個跨平台的遊戲機模擬器系統,可以運行在Windows、Linux、Mac OS X等作業系統上。安裝與設定部分可參考這篇文章:「 RetroArch v1.7.9 – 超強大的掌機/家機/街機遊戲全能模擬器|支援繁體中文 」。 不過筆者在安裝時,因為筆者的Windows系統沒有安裝DirectX 9.0c Runtime,必須在將此選項給勾選。 安裝完之後,筆者找了以前中學時很喜歡的遊戲 Landstalker: The Treasures of King Nole 以及   The Story of Thor: A Successor of The Light 來試玩。 若您覺得文章寫得不錯,請點選文章上的廣告,來支持小編,謝謝。 If you like this post, please click the ads on the blog or buy me a coffee . Thank you very much.

Git 常用指令(Git Tips)

此篇記錄筆者常用的Git指令。 Configuration相關 git config --global user.name "username" git config --global user.email "username@mail.domain.address" git config --global core.editor vim # Line Ending git config --global core.autocrlf input git config --global core.safecrlf true # Color Highlighting git config --global color.diff auto git config --global color.status auto git config --global color.branch auto or git config --global color.ui auto # Set bare repository git config --bool core.bare true git config --bool core.bare false # Sharing repository with group member git config core.sharedRepository group git repo-config core.sharedRepository group # Proxy Setting git config --global http.proxy http://proxyuser:proxypwd@proxy.server.com:8080 git config --global https.proxy http://proxyuser:proxypwd@proxy.server.com:8080 Backup 相關 Backup a git repository (The quick and easy way) git bundle create bundleName/Path/To branch_name git bundle...

在Linux 安裝 Web Server(Installing Web Server on Linux)

圖片
網頁伺服器軟體(Web Serve Software)有很多種可以用,用 Google搜尋Web Server 可以看到類似下圖的結果: 而本文要介紹的是給Java開發者用的Jetty,此外Jetty也可安裝在 樹莓派 上。本文所使用的作業系統是安裝在 VirtualBox 虛擬機上的 Lubuntu Desktop 18.04 (32-bit) 。 💡 什麼是 Jetty? 在眾多網頁伺服器軟體(Web Server Software)中, Jetty 是一款專為 Java 開發者設計的輕量級、基於 Java 的網頁伺服器與 Servlet 容器。它因為記憶體佔用小、啟動速度快,除了常被內嵌在大型 Java 應用程式中,也非常適合安裝在樹莓派(Raspberry Pi)等資源有限的嵌入式裝置上。 本文將詳細介紹如何在虛擬機環境(本範例採用 VirtualBox 上的 Lubuntu Desktop)中,透過終端機進行 Jetty 的安裝、狀態檢查與服務管理。 🛠️ 第一步:系統套件更新 在安裝任何新軟體之前,強烈建議先更新系統的套件清單並升級既有軟體,以確保安裝過程的相容性與系統安全性。 請開啟終端機(Terminal),依序執行以下指令: # 更新套件來源清單,獲取最新的軟體版本資訊 sudo apt-get update # 升級系統中所有已安裝的軟體套件至最新版本 sudo apt-get upgrade 📥 第二步:安裝 Jetty 伺服器 更新完成後,我們可以直接透過 Ubuntu/Lubuntu 內建的 APT 套件管理器來安裝 Jetty(此處以穩定版 Jetty 9 為例): # 安裝 Jetty 9 網頁伺服器 sudo apt-get install jetty9 系統會自動下載 Jetty 及其所需的 Java 執行環境(JRE)依賴套件。 ⚙️ 第三步:使用 systemd 管理 Jetty 服務 在現代 Linux 系統中,我們使用 systemctl 指令來控制後台服務(DAEMON)。以下是管理 Jetty 伺服器最常用的五個關鍵指令: 1. 檢查伺服器狀態 在安裝完成或遇到連線問題時,先檢查伺服器目前是否正常運作: sudo systemctl status jetty9 若看到 active (runnin...

打造自己的APCS實作題系統環境

底下文件是參考APCS官網所提供的 系統環境資訊 而建立出來的虛擬環境,用的 Lubuntu 版本是 Lubuntu Desktop 18.04 (32-bit) 。 文件下載處: APCS_Lubuntu環境建立 若您覺得文章寫得不錯,請點選文章上的廣告,來支持小編,謝謝。 If you like this post, please click the ads on the blog or buy me a coffee . Thank you very much.

調整 Lubuntu 的一些小技巧(Several tips for Lubuntu)

圖片
在安裝裝好 Lubuntu 後,底下是筆者覺得可以做調整的事項。 1. 啟用額外的套件(Enable additional package repositories): 可以在Package Manager找到類似下圖的選項(筆者使用Muon Package Manager。)在 Ubuntu Software 分頁將自己要用的選項給打勾: (Check the following options in the lubuntu package manager) 2. 系統更新(System Updating): sudo apt update sudo apt upgrade sudo apt dist-upgrade 3. 安裝常用工具(Installing common utilities): sudo apt-get install numlockx parcellite 4. 防火牆設定(Enable Firewall): sudo ufw enable sudo ufw disable sudo apt install gufw 5. 安裝媒體編碼套件(Install media codec): sudo apt install lubuntu-restricted-extras sudo apt install libavcodec-extra sudo apt install libdvd-pkg 6. 系統清理(System cleanup): sudo apt-get autoclean sudo apt-get clean sudo apt-get autoremove 7. 系統加速(Speed up system): Install preload package sudo apt-get install preload 若您覺得文章寫得不錯,請點選文章上的廣告,來支持小編,謝謝。 If you like this post, please click the ads on the blog or  buy me a coffee . Thank you very much.

Git repository 入門觀念與使用

圖片
筆者的部落格有兩篇與git有關的文章,分別為: git 的五四三 程式碼控制軟體Git 介紹 ( Slides for Introduction to git ) 而本篇為筆者要複習以前所學的筆記。我們都已經安裝好 git 了,且示範的作業系統為 Lubunt 18.10 。。 基本設定 在使用git的時候,會需要committer的一些資訊,例如名稱、電子郵件等,這時候我們可以透 過 git config 的指令來設定。而 git config 的詳細說明可以參考 https://git-scm.com/docs/git-config 。底下指令就是用來設定 committer 名稱與電子郵件: git config --global user.name "Holan.Liao" git config --global user.email Holan@your.email.address 也可設定編輯器(Editor),底下為設定使用 vim 做為編輯器: git config --global core.editor vim 若是在Windows系統上時, git config --global core.editor "'C:/Program Files/YourProgramFilePath' -multiInst -nosession" 換行結束符號設定: git config --global core.autocrlf input git config --global core.safecrlf true Color Highlighting: git config --global color.diff auto git config --global color.status auto git config --global color.branch auto or git config --global color.ui auto 顯示目前的設定: git config --list 建立 Repository 在建立 git repository之前,會需要建立專案程式碼的資料夾,此資料夾用來存放與...

將樹莓派當成Wifi路由器(Raspberry Pi Become a Wifi Router)

圖片
本文介紹如何將樹莓派變成一個Wifi路由器。 步驟一:Install the router software sudo apt-get install isc-dhcp-server 上圖是顯示DHCP server啟動失敗,不會影響後續的安裝與設定。 安裝 HostAPD wget https://github.com/jenssegers/RTL8188-hostapd/archive/v1.1.tar.gz tar -zxvf v1.1.tar.gz cd RTL8188-hostapd-1.1/hostapd sudo make sudo make install 步驟二:Configure the ISC-DHCP-Server 執行底下指令來修改 ISC-DHCP Server的設定檔,當然可以使用其他的文字編輯器來操作: sudo nano /etc/dhcp/dhcpd.conf 註解底下兩行: option domain-name "example.org"; option domain-name-servers ns1.example.org, ns2.example.org; 取消此行的註解: #authoritative; 將下面的設定值複製到/etc/dhcp/dhcpd.conf 檔案的結尾。 subnet 192.168.10.0 netmask 255.255.255.0 { range 192.168.10.100 192.168.10.200; option broadcast-address 192.168.10.255; option routers 192.168.10.1; default-lease-time 600; max-lease-time 7200; option domain-name "local-network"; option domain-name-servers 8.8.8.8, 8.8.4.4; } 修改/etc/default/isc-dhcp-server sudo nano /etc/default/isc-dhcp-server 更新 INTERFAC...

在樹莓派上開發微型的作業系統(MiniOS for Raspberry Pi)

圖片
筆者所使用的作業系統: Lubuntu 18.10 。 環境建立 安裝 Cross Compiler For Raspberry Pi 2: sudo apt install gcc-arm-none-eabi For Raspberry Pi 3: sudo apt install gcc-aarch64-linux-gnu build-essential 安裝模擬器 sudo apt install qemu-system-arm 第一個程式例子「Hello Uart」 需要分別建立底下的檔案: The kernel entry point「boot.S 」 The C code「kernel.c」 Tying the pieces together「linker.ld」 A special file that contains shell commands「Makefile」 底下就以RPI2與RPI3來當作例子吧。 1. Say "Hello" to RPI2 UART 在 https://jsandler18.github.io/ 裡,有針對這四個檔案做說明: boot.S:  https://jsandler18.github.io/explanations/boot_S.html kernel.c:  https://jsandler18.github.io/explanations/kernel_c.html linker.ld:  https://jsandler18.github.io/explanations/linker_ld.html Makefile:  https://github.com/jsandler18/raspi-kernel/blob/9208b9b20134909b107cb344c90f57c2c72c377d/Makefile 若不使用Makefile與make來編譯與執行時,需用底下指令來編譯 arm-none-eabi-gcc -mcpu=cortex-a7 -fpic -ffreestanding -c boot.S -o boot.o arm-none-eabi-gcc...

在Lubuntu上使用qemu建立模擬樹莓派環境

圖片
筆者所用的OS系統為Lubuntu 18.10。首先要安裝arm版本的qemu,指令如下: sudo apt install qemu-system-arm 會需要三個檔案: Raspbian Stretch Lite image Linux Kernel(kernel-qemu-4.14.50-stretch) Device Tree Blob(versatile-pb.dtb) 註:當然可以使用有桌面環境的 Raspbian Stretch with desktop 筆者將kernel-qemu-4.14.50-stretch與versatile-pb.dtd放bootpart資料夾下: 接著執行底下指令: qemu-system-arm -kernel bootpart/kernel-qemu-4.14.50-stretch -dtb bootpart/versatile-pb.dtb -m 256 -M versatilepb -cpu arm1176 -serial stdio -append "rw console=ttyAMA0 root=/dev/sda2 rootfstype=ext4 loglevel=8 rootwait fsck.repair=yes memtest=1" -drive file=2019-04-08-raspbian-stretch-lite.img,format=raw -redir tcp:5022::22 -no-reboot 執行結果畫面: 參考資料: https://github.com/wimvanderbauwhede/limited-systems/wiki/Raspbian-%22stretch%22-for-Raspberry-Pi-3-on-QEMU 若您覺得文章寫得不錯,請點選文章上的廣告,來支持小編,謝謝。 If you like this post, please click the ads on the blog or  buy me a coffee . Thank you very much.