使用 WebGL 來學習 OpenGL的基礎觀念

若您覺得文章寫得不錯,請點選文章上的廣告,來支持小編,謝謝。

此篇為延續OpenGL 入門筆記一文。這幾天在學習OpenGL時,因為在建立開發環境上,會根據不同的作業系統以及IDE工具來設定,步驟繁瑣,於是筆者就看到了WebGL。透過有支援WebGL的瀏覽器以及線上IDE(例如 CodePen等),可以很輕鬆地建立起開發環境,以快速來學習OpenGL的觀念。

此外Mozilla開發者網站也有提供教學[1],此教學的內容大綱如下:
WebGL2 Fundamentals也提供了非常豐富的教學資源,以及互動式的程式範例(見下圖)

Happy OpenGL programming!!!

參考資料:
[1] https://developer.mozilla.org/en-US/docs/Web/API/WebGL_API/Tutorial
[2] https://webgl2fundamentals.org/

OpenGL 入門筆記

若您覺得文章寫得不錯,請點選文章上的廣告,來支持小編,謝謝。

筆者最近在工作上有接觸到OpenGL的程式碼,在閱讀這些程式碼的時候,有些疑惑,所以請同事建議一些參考資料,其中最主要的是OpenGL Tutorial[1]。而在參考 Basic OpenGL 前三篇:

來實作Matrices的Translation時,發現結果與預期中不相同。問了同事之後,才知道Shader program中矩陣相乘的順序要更改才會是預期中的Translation結果。

為了說明實際情況是什麼,筆者在Windows 10上使用Code::Blocks IDE來呈現。在使用CMake來產生Code::Blocks IDE專案檔時,若發生找不到libintl-8.dll檔案,只要將下面一行

C:\Program Files (x86)\CodeBlocks\MinGW\bin
加到系統環境變數即可。接著使用Code::Blocks IDE開啟Tutorials.cbp專案檔

Tutorial 1 : Opening a window 是說明如何建地開發環境,以及單純地用Graphics Library Framework(GLFW)來建立視窗,原作者都有在程式碼裡註解說明,所以沒什麼特別注意的。

而在閱讀Tutorial 2 : The first triangle時,為了理解Screen Coordinates,筆者試著修改程式來畫出矩形,於是將
修改成

並將

改成
用來畫出由兩個三角形所組成的矩形。結果如下圖所示:


Tutorial 3 : Matrices得知,會有幾個矩陣在做轉換的動作(下圖出自Tutorial 3 : Matrices):

為了簡化問題的呈現,筆者將這幾個矩陣變成一個,此部分的程式碼由原本的:

變成

來看一下原本的Shader program
會跑出什什麼結果呢?

改Shader program變成下面:


此時會有什麼結果呢?


心得:矩陣相乘是有順序之分別的。


自我練習:
為了要讓矩形內的兩個三角形呈現不同顏色,於是筆者又將Tutorial 2 : The first triangle程式修改。(可從Github下載此範例)


參考資料:
[1] http://www.opengl-tutorial.org/

Tinkercad Circuits:Ultrasonic 倒車雷達(Parking sensor simulation)

若您覺得文章寫得不錯,請點選文章上的廣告,來支持小編,謝謝。

If you like this post, please click the ads on the blog or buy me a coffee. Thank you very much.

此文將本部落格「Tinkercad Circuits:Ultrasonic 自動照明」一文做修改,改成「倒車雷達」的模擬。距離越遠,燈泡亮度變暗,蜂鳴器聲音頻率變小;距離越近,燈泡亮度變亮,蜂鳴器聲音頻率變大。
This article modifies this blog post:"Tinkercad Circuits:Ultrasonic 自動照明" to simulate a parking sensor.

材料(Materials):
  • Arduino UNO R3 板子 x 1
  • 距離感測器模組 Ultrasonic x 1
  • 燈泡 light bulb x 1
  • 杜邦線 jumper wire x 7
  • 壓電式蜂鳴器 Piezo x 1
電路(Circuit):

The ultrasonic SIG pin is connected to arduino pin 12.
The Piezo positive pin is connected to arduino pin 10.
One of the light bulb is connected to arduino pin 5.

程式碼(The Code):


示範影片(Demo Video):


範例連結(Example Link):
https://www.tinkercad.com/things/1ueL7ExE7Ue

如何解釋mBlock這兩個串口積木

若您覺得文章寫得不錯,請點選文章上的廣告,來支持小編,謝謝。

mBlock有讀取串口(SerialPort)的兩個積木:


我們可以用底下例子解釋這兩個串口積木。

有一對情侶在聊天,
情境一
突然女方問男方:「你剛剛說了幾個字?」男方:「.....我怎麼可能記得啊!」
女方問男方:「你等一下要說幾個字的話?」男方:「3個。」
女方:「是哪三個字?」男方: 「不想說」

"串口可讀取字節數" (UNO問) ==> 回應數字5時,代表藍芽模組 "有5個字要說"
"串口讀取一個字節" (UNO 女方 問下一個字是什麼) ==> 這時會得到 不 這個字"串口讀取一個字節" (UNO 女方 問下一個字是什麼) ==> 這時會得到 想 這個字 "串口讀取一個字節" (UNO 女方 問下一個字是什麼) ==> 這時會得到 說 這個字 "串口讀取一個字節" (UNO 女方問下一個字是什麼) ==> 這時得不到任何字

而mBlock只提供一次讀一個字的積木,但其實Arduino可是有提供其他方法讀取的。

情境二
女方就是Arduino UNO,而男方是藍芽模組,
以男方準備說「不想說」這三個字為例。
這也是為什麼在mBlock程式會先用 "串口可讀取字節數" (「你等一下要說幾個字的話?」) 來判斷,
若學生問為什麼不要一次讀整個句子時,這時可以說:「甜言蜜語總是要一個一個字說嘛!」

Tinkercad Circuits:Light the light bulb(光控燈泡)

若您覺得文章寫得不錯,請點選文章上的廣告,來支持小編,謝謝。

本部落格有光控系列文章:
  1. Tinkercad Circuits:光控自走車 Light-Controlled Car
  2. Tinkercad Circuits:NeoPixel Ring 光控燈
  3. mBlock 單元五:使用光敏電阻控制 LED 燈亮度 ( mBlock Unit 5: Controlling a LED lightness with a photoresistor )
  4. mBlock 單元十三:光感應開門系統 ( mBlock Unit 13: Light-responsive Door )
  5. mBlock 單元十五:追光自走車 ( mBlock Unit 15: Light-Tracking Car )

皆使用光敏電阻來做控制應用,但都需要寫程式以及一個控制器才能做出來,於是筆者開始想用在沒有寫程式與控制器的限制下來設計一些電路,於是來設計光控燈泡、光控LED燈、光控三色LED燈的電路。

展示影片:


Tinkercad Circuits 光控燈泡範例網址:https://www.tinkercad.com/things/jYCvGfbCJP6
Tinkercad Circuits 光控LED範例網址:https://www.tinkercad.com/things/kcI7v8cMhqp 
Tinkercad Circuits 光控三色LED範例網址:https://www.tinkercad.com/things/2myYh8lmwwZ

Tinkercad Circuits:Bi-direction motor(馬達正反轉)

若您覺得文章寫得不錯,請點選文章上的廣告,來支持小編,謝謝。

最近有人給筆者看了電動升降機的影片:


並且詢問筆者如何設計馬達正反轉的電路,於是筆者請教Google大神,在instructables網站找到了「Simple Bi-directional Switch」一文,此文提供的電路設計如下:


於是筆者用TinkerCAD Circuit設計類似的電路來模擬,結果影片如下:


TinkerCAD Circuit範例網址:https://www.tinkercad.com/things/kVcD0hBA108

Tinkercad Circuits:Three Responder(搶答器)

若您覺得文章寫得不錯,請點選文章上的廣告,來支持小編,謝謝。

If you like this post, please click the ads on the blog or buy me a coffee. Thank you very much.

本文使用TinkerCAD Circuits來示範 LED、按鈕(PushButton)、壓電式蜂鳴器(Piezo)的綜合應用:「搶答器」,每個按鈕有對應的LED燈與聲音。
This is an application: "Three Responders system". The application uses LEDs, push buttons and a piezo to implement the system. Each push button has its own tone and turn on a LEDs when the push button is pressed.

材料(Materials):

  • Arduino UNO R3 板子 x 1
  • 杜邦線 jumper wire x 14
  • LED x 3
  • 小型麵包板 small breadboard x 1
  • 100歐姆電阻 100 ohm resistor x 1
  • 220歐姆電阻 220 ohm resistor x 3
  • 10K歐姆電阻 10K ohm resistor x 3
  • 壓電式蜂鳴器 Piezo x 1
  • 按鈕 PushButton x 3


電路(Circuit):
Push buttons are connected to Arduino UNO A2, A1, and A0.
LEDs are connected to Arduino UNO pin 9, 10, and 11.
Piezo is connected to Arduino pin 8.

程式碼(The Code):


示範影片(Demo Video):


範例連結(Example Link):
https://www.tinkercad.com/things/hEVABPuN1g7

Python Puzzler 12: ABC

若您覺得文章寫得不錯,請點選文章上的廣告,來支持小編,謝謝。

底下的Java程式碼會有什麼結果?
1
2
3
4
5
6
7
public class Abc {
    public static void main(String[] args) {
        String letters = "ABC";
        char[] numbers = { '1', '2', '3' };
        System.out.println(letters + " easy as " + numbers);
    }
}

使用JDK11.0.2的結果為 ABC easy as [C@5c8da962 。這是因為 numbers 是 ,而字元陣列會呼叫Object的toString(),但我們沒有將toString() method 給 Overwrite,於是會得到一組Hash code的數值。     

那我們來看看在Python裡,會有什麼結果?
1
2
3
letters = "ABC"
numbers = { '1', '2', '3' }
print(letters + " easy as " + numbers)

上述的程式碼會得到下面的錯誤訊息:
1
2
    print(letters + " easy as " + numbers)
TypeError: can only concatenate str (not "set") to str

這是因為在 Python 裡,{ '1', '2', '3' } 會是集合(set)的語法。而且因為 letters 是str,所以 + 會被當成字串合併來執行。

Python Puzzlers 11: The Last Laugh

若您覺得文章寫得不錯,請點選文章上的廣告,來支持小編,謝謝。

底下的Java程式碼會有什麼結果?
1
2
3
4
5
6
public class LastLaugh {
    public static void main(String args[]) {
        System.out.print("H" + "a");
        System.out.print('H' + 'a');
    }
}

結果會是Ha169。為什麼會這樣子呢?這是因為 'H' 與 'a' 這兩個字元被Java當成整數型態來處理了, H 的 ASCII Code 為 72, a 的 ASCII Code 為 97,然後進行整數加法運算 72 + 96 = 169,結果就是這樣子來的。

那我們來看看在Python裡,會有什麼結果?
1
2
print("H" + "a")
print('H' + 'a')

其結果為
Ha
Ha

於是我們可以得知,在 Python 中,字元與字串進行加法(+)運算會是字串合併的結果。

Debug Python Code in Visual Studio Code

If you like this post, please click the ads on the blog or buy me a coffee. Thank you very much.


In the previous post, we set up the Python development environment with Visual Studio Code. But that's not enough. Sometime, we need to debug our python code. In this post,

Step 1: Configure the debugger
Go to line 2 of test.py and  press F9 to set a breakpoint. 

Then, click the Debug View in the sidebar:
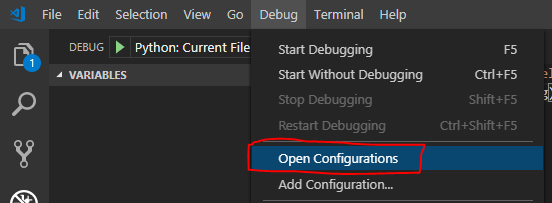
Use the Debug > Open configurations menu command to open the debug configuration:

Select Python: Current File (Integrated Terminal)

Add the  
"stopOnEntry": true
setting to the current configuration file:
{
"name": "Python: Current File (Integrated Terminal)",
"type": "python",
"request": "launch",
"program": "${file}",
"console": "integratedTerminal",
"stopOnEntry": true
}

Step 2: Run the debugger
Save launch.json, switch to test.py in the editor, then run the debugger by selecting the Debug icon from the menu in the left toolbar.

Then click the arrow in the debug toolbar or press F5.

If you see the following screen in your environment, you could debug your program now. Congratulation!!!!

PyGame 音效與音樂

若您覺得文章寫得不錯,請點選文章上的廣告,來支持小編,謝謝。

聲音的基本原理
維基百科對聲音的解釋如下:
聲音是振動產生的聲波,通過介質氣體固體液體)傳播並能被人或動物聽覺器官所感知的波動現象。

而在 聲音記錄與重播的基本原理 一文中,也說明了聲音是聲波推動人耳的耳膜所產生的感受」

PyGame Tutorial: Music and Sound Effects一文,我們可以知道Pygame控制音樂的基礎程式寫法:

Playing a song once(播放音樂一次):

pygame.mixer.music.load('foo.mp3')
pygame.mixer.music.play(0)


底下也是播放一次:
pygame.mixer.music.play() # play once


Playing a song infinitely(一直重複播放):

pygame.mixer.music.load('foo.mp3')
pygame.mixer.music.play(-1)


Queuing a Song(加到播放清單):

這個會在播完一首後,繼續播放清單(Queue)裡的音樂。
pygame.mixer.music.queue('next_song.mp3')


Stopping a Song(停止播放):

pygame.mixer.music.stop()
判斷音樂是否結束播放:
SONG_END = pygame.USEREVENT + 1pygame.mixer.music.set_endevent(SONG_END)
while True:
for event in pygame.event.get():
if event.type == SONG_END:
print("the song ended!")

依照這些function以及一點點的GUI設計,就可以設計出簡易的 mp3 player了。
底下程式碼中,按鈕的圖片來源:http://www.iconarchive.com/show/nuoveXT-icons-by-saki.2.html。而測試的音樂是從 https://www.bensound.com/ 下載的。

程式碼:https://gist.github.com/pinglunliao/258aa68c6525f0d8793061e949653761
程式壓縮檔下載處


Demo Video: