# architecture 模組,含有 FaceNet 網路架構 InceptionResNetV2
from architecture import *
# 作業系統常用函式庫,如列出資料夾所有檔案
import os
# 電腦視覺處理函式庫
import cv2
# Multi-task Cascaded Convolutional Neural Networks
# 用來偵測人臉
import mtcnn
# 讀取與儲存 Python 物件函式庫
import pickle
# 多維度陣列運算的數學函式庫
import numpy as np
# Normalizer 正規化函式庫
from sklearn.preprocessing import Normalizer
# 讀取神經網路模型函式庫
from tensorflow.keras.models import load_model

###### 路徑與變數 ##########
face_data = 'Faces/'

# 將圖片中人臉,做正規化後的大小
required_shape = (160,160)

# facenet 編碼器
face_encoder = InceptionResNetV2()

# 設定 google facenet 建立好的模型參數檔案路徑
path = "facenet_keras_weights.h5"

# 讀取 google facenet 的模型參數
face_encoder.load_weights(path)
# 使用 mtcnn 人臉偵測器
face_detector = mtcnn.MTCNN()

# 訓練後的人臉編碼串列
encodes = []
# 訓練後的人臉編碼表
encoding_dict = dict()

# L2 正規化
l2_normalizer = Normalizer('l2')

###############################
# 正規化
def normalize(img):
    mean, std = img.mean(), img.std()
    return (img - mean) / std


# 對 Faces 資料夾下的每一人,擷取臉部特徵
for face_names in os.listdir(face_data):

    # 設定某甲的人臉資料夾路徑
    person_dir = os.path.join(face_data,face_names)

    # 讀取某甲的每一張臉
    for image_name in os.listdir(person_dir):
        # 設定某甲某張臉的檔案路徑
        image_path = os.path.join(person_dir,image_name)

        # 讀取某甲某張臉,BGR的格式
        img_BGR = cv2.imread(image_path)
        # 某甲某張臉 BGR 格式轉換成 RGB 格式,RGB格式才能給 mtcnn 人臉偵測器使用
        img_RGB = cv2.cvtColor(img_BGR, cv2.COLOR_BGR2RGB)

        # 找人臉特徵的位置
        x = face_detector.detect_faces(img_RGB)
        # 框出來的人臉位置長方形 box:x1、y1、width寬、height高
        x1, y1, width, height = x[0]['box']


        #print(type(height))
        #print(height)

        # 將人臉的高度除2,也就是取上半臉
        height = int(height / 2)
        #print(height)

        # 框出來的人臉位置長方形 box的左上角位置
        x1, y1 = abs(x1) , abs(y1)
        # 框出來的人臉位置長方形 box的右上角位置
        x2, y2 = x1+width , y1+height

        # 從圖片取出人臉
        face = img_RGB[y1:y2 , x1:x2]

        # 正規化,讓每一人臉照片的大小都一樣
        face = normalize(face)
        face = cv2.resize(face, required_shape)

        # 改變 face 的維度
        face_d = np.expand_dims(face, axis=0)
        # 做預測的編碼
        encode = face_encoder.predict(face_d)[0]
        # 將此張人臉編碼,加到人臉編碼串列
        encodes.append(encode)

    # 將新的人臉編碼加入人臉編碼表
    if encodes:
        encode = np.sum(encodes, axis=0 )
        encode = l2_normalizer.transform(np.expand_dims(encode, axis=0))[0]
        encoding_dict[face_names] = encode

# 存檔
path = 'encodings/encodings.pkl'
with open(path, 'wb') as file:
pickle.dump(encoding_dict, file)# 電腦視覺處理函式庫
import cv2
# 多維度陣列運算的數學函式庫
import numpy as np
# Multi-task Cascaded Convolutional Neural Networks
# 用來偵測人臉
import mtcnn
# architecture 模組,含有 FaceNet 網路架構 InceptionResNetV2
from architecture import *
# 使用 train_v2 normalize 與 l2_normalizer
from train_v2 import normalize,l2_normalizer
# 使用 cosine 來計算某兩張臉的相似度
from scipy.spatial.distance import cosine
# 讀取神經網路模型函式庫
from tensorflow.keras.models import load_model
# 讀取與儲存 Python 物件函式庫
import pickle
# 偵測到人臉的可信度最低值
confidence_t=0.99
# 相似程度
recognition_t=0.5
# 將圖片中人臉,做正規化後的大小
required_size = (160,160)
# 取得圖片中的人臉 face,人臉位置左上角(x1,y1)與右下角(x2,y2)
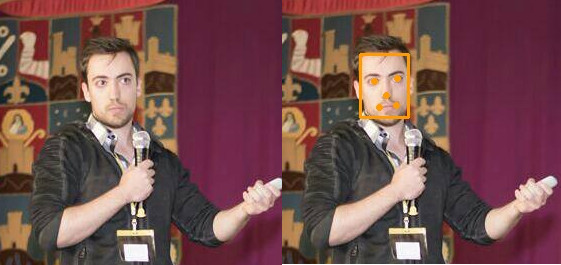
def get_face(img, box):
x1, y1, width, height = box
x1, y1 = abs(x1), abs(y1)
# 取上半臉
height = int(height/2)
x2, y2 = x1 + width, y1 + height
face = img[y1:y2, x1:x2]
return face, (x1, y1), (x2, y2)
# 取得人臉特徵編碼
def get_encode(face_encoder, face, size):
face = normalize(face)
face = cv2.resize(face, size)
encode = face_encoder.predict(np.expand_dims(face, axis=0))[0]
return encode
# 讀取人臉特徵編碼表
def load_pickle(path):
with open(path, 'rb') as f:
encoding_dict = pickle.load(f)
return encoding_dict
# 偵測人臉
def detect(img ,detector,encoder,encoding_dict):
# 人臉 BGR 格式轉換成 RGB 格式,RGB格式才能給 mtcnn 人臉偵測器使用
img_rgb = cv2.cvtColor(img, cv2.COLOR_BGR2RGB)
# 人臉偵測結果,可能會有好幾處偵測到人臉
results = detector.detect_faces(img_rgb)
# 對影像中每一處可能為人臉的地方
for res in results:
# 此人臉是否有超過 confidence_t ,若沒有超過 0.99,就跳過此人臉
if res['confidence'] < confidence_t:
continue
# 取得圖片中的人臉 face,人臉位置左上角 pt_1 與右下角 pt_2
face, pt_1, pt_2 = get_face(img_rgb, res['box'])
# 取得人臉特徵編碼
encode = get_encode(encoder, face, required_size)
# 人臉特徵編碼正規化
encode = l2_normalizer.transform(encode.reshape(1, -1))[0]
# 是誰呢?
name = 'unknown'
# 與誰的臉最相似
distance = float("inf")
# 找出與 Faces資料夾下的某人最相似
for db_name, db_encode in encoding_dict.items():
# 此人臉與某甲的相似度
dist = cosine(db_encode, encode)
# 若有比 recognition_t 0.5 還小,此人臉就非常有可能是這位某甲
if dist < recognition_t and dist < distance:
# 將人臉名稱為某甲的姓名
name = db_name
# 更新相似度,繼續找更相似的某甲
distance = dist
# 將人臉的名稱顯示在圖片上
if name == 'unknown':
cv2.rectangle(img, pt_1, pt_2, (0, 0, 255), 2)
cv2.putText(img, name, pt_1, cv2.FONT_HERSHEY_SIMPLEX, 1, (0, 0, 255), 1)
else:
cv2.rectangle(img, pt_1, pt_2, (0, 255, 0), 2)
cv2.putText(img, name + f'__{distance:.2f}', (pt_1[0], pt_1[1] - 5), cv2.FONT_HERSHEY_SIMPLEX, 1,
(0, 200, 200), 2)
# 回傳處理過的圖片,讓更新過的圖片顯示在視訊鏡頭視窗畫面上
return img
if __name__ == "__main__":
# 將圖片中人臉,做正規化後的大小
required_shape = (160,160)
# facenet 編碼器
face_encoder = InceptionResNetV2()
# 設定 google facenet 建立好的模型參數檔案路徑
path_m = "facenet_keras_weights.h5"
# 讀取 google facenet 的模型參數
face_encoder.load_weights(path_m)
# 訓練後的人臉編碼表檔案路徑
encodings_path = 'encodings/encodings.pkl'
# 使用 mtcnn 人臉偵測器
face_detector = mtcnn.MTCNN()
# 讀取訓練後的人臉編碼表
encoding_dict = load_pickle(encodings_path)
# 設定鏡頭為作業系統編號0的視訊鏡頭
cap = cv2.VideoCapture(0)
# 當成公開啟視訊鏡頭
while cap.isOpened():
# 讀取視訊鏡頭影像,ret 為讀取影像的結果狀態,frame為影像本身。
ret,frame = cap.read()
# 將影像左右翻轉
frame = cv2.flip(frame,1)
# 讀取影像沒有成功
if not ret:
print("CAM NOT OPEND")
break
# 將視訊影像做人臉偵測,並將偵測結果更新到 frame 影像上
frame = detect(frame , face_detector , face_encoder , encoding_dict)
# 將人臉偵測結果顯示在式窗上
cv2.imshow('camera', frame)
# 若按下按鍵 q,退出程式
if cv2.waitKey(1) & 0xFF == ord('q'):
# 釋放視訊鏡頭資源
cap.release()
# 關閉程式所開啟的視窗
cv2.destroyAllWindows()
break